


REVOLUTIONARY COMPUTER LIGHTING CONTROL SYSTEM
KOOLFUSION Controller powered by Lightjams
Welcome! Let's start our journey with a tutorial showing the main features of the Koolfusion Controller, from patching to the creation of a pixel mapping project.
In the following tutorial, we'll see how to create a 80x12 LED wall and map videos on it. The integrated media server in Koolfusion controller can handle up to 64 media files, including videos and still images. The idea is to use your videos and images as grid's backgrounds.
Coming next, a tutorial showing how to sequence your lighting effects and activate them one at a time using a timer or a MIDI keyboard. In this case we'll sequence 3 scenes using 16 moving heads. This is very similar to a cuelist, where the GO button could be linked to any external input. Download the project file.
Sources And Attributes
A source emits energy. Think about it as a radio emitter. You can use as many as you want and configure them in countless ways to achieve the effects you have in mind. On the receiving end, fixture attributes (dimmer, RGB, pan, tilt...) catch the source's energy and relay it to your real fixtures.
Grids
Grids are your playground, your canvas. Follow your creative flow and use them as you please. Their job is simply to hold the sources and attributes. You can create an unlimited number of grids and put them together to build a logical hierarchy using groups. Groups and grids can represent a simple effect, a scene, a cuelist, a reusable building block... You are the one giving the meaning.
Formulas (Command Line)
This is the second level in the Koolfusion controller. At first you don't see any formula - you just click the shiny buttons. Then a time will come when you'll want to customize your experience more and more. At this moment, you'll discover that under every slider hides a math formula waiting to be edited. Don't be afraid. The formula's syntax is pretty simple and if you've used any spreadsheet app like Excel, you already know the drill.
Summary
In the Koolfusion controller, great effects are created using clever spacial positionning of sources and attributes with some math formula spices.
Adding Attributes To The Grid
The most important thing to know is that you can select multiple attributes in the list - if you're used to standard Windows list control then you already know how to do it. You have to use a combination of keyboard keys and mouse click:
CTRL-A: Select all attributes
CTRL and click an attribute: Add this attribute to the selection or remove it if already there.
SHIFT and click an attribute: Select all attributes from the last selected to this one.
As the fastest way to select attributes is using the CTRL-A shortcut, it is a good idea to first narrow down the list by typing some keywords in the search box. For example, if you want to select all intensity attributes, instead of selecting attributes one by one, you can type "intensity" (only "int" should do) in the search box and then click the first attribute and press CTRL-A. For more complex selections, you'll come to like giving your fixtures a group name so that you can select them really fast.

Once your selection done, there are two ways to add all attributes on the grid:
"Painting" mode: Click on the grid and hold the mouse button while you move the mouse around. If you want to keep "painting" even after all attributes have been added, you can hold the CTRL key.
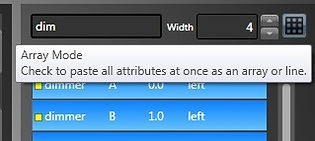
Array mode: When multiple attributes are selected, you can click the array mode button. Then you specify the with of your array and just click on the grid where you want the array to begin. If you hold the CTRL key at the same time, attributes will fill all available space from the (0,0) cell up to the clicked cell.
Modifying Attributes' order: Want to reverse the order of your attributes to do a special effect? Select your attributes on the grid and go in the Edit/Attributes menu. You can flip the attributes horizontally, vertically and even randomize the order.
Grid Edition Tips
CTRL+Q: Keyboard shortcut to toggle between source and attribute edition mode. Since you can put a source and an attribute in the same cell, you have to be in the proper mode to select the item you want.
CTRL+Number: Keyboard shortcut to quickly switch between grids. CTRL+1 selects the first grid.
You can select multiple items on the grid by clicking on an empty cell and holding the mouse button while you move the mouse. This creates a selection rectangle. Once the selection's done, you can remove items by clicking on them while holding the CTRL key.
You can move all selected items at once by clicking on a selected item and dragging it.
You can copy/paste the selected items. Mostly useful to create multiple identical sources.
Hue, Saturation and Intensity (HSI) Color Representation
Whatever your fixture color mixing capability is (RGB, RGBW, CMY...), you always end up working with hue, saturation and intensity attributes in the Koolfusion controller . This representation is more handy to create lighting effects. In order to see some light, you have to put the intensity attributes on the grid and send them power. Otherwise, the default intensity value is 0%. Note that 50% is full color and 100% is pure white (really intense light) .
If your fixture has a dedicated dimmer channel, then the default intensity value is 50% and the dimmer is 0%, meaning you have in this case to add the dimmer attributes on the grid to see something.
Main Interface

1. Sources
A source emits power propagating like a light wave. This makes creating lighting effects fairly natural. You set:
-
Power: Intensity if you prefer. Green represents positive power and red is negative.
-
Range: How far the power goes. 0% means emit only at the current position and 100% means no power loss.
-
Delay: How quick the wave propagates. 0% means no delay, so instantaneously.
-
X and Y: Current source position. (0,0) is bottom left.
-
Direction: Indicate where the wave goes.
Since powers are additive, you can use multiple sources to achieve complex effects.

2. Grid
A grid is your playground. Use it as you please. No need to replicate the physical world. You position items to achieve your desired effect.
You can resize the grid up to 400x80. You can move around by using the arrow keys, right-click and drag (like Google maps), click on the scroll buttons or use the minimap (old school Starcraft).
At the top, you have some grid's configuration. First you have it's name which can be changed by clicking the rename menu item under the Grid menu. Then you have the fade in and fade out, applying to all sources on the grid. You can use the fade properties to smooth interactive inputs like wiimote movement and reduce the jitter effect.

2.1 Grid Settings
You access more grid settings by going to the View and then the Grid menu item. You'll see an overview (minimaps) of all your grids and the sub-master sliders.
The activation slider modulates all source powers on the grid. If set to 0%, the grid is deactivated.
The speed slider acts as a speed sub-master. The final speed for all time based functions will be the master speed times the grid speed.
There is also a precedence parameter which allows some grids to overwrite lowest precedence grids. For example, if you use a wiimote but want to be able to take over with a midi device. Attribute values from same precedence grids are added, allowing to merge multiple effects running on multiple grids.

3. Fixture Attributes
Attributes receive source powers and do the conversion to DMX values. The attribute list shows all attributes of your patched fixtures. Each attribute type has its own color code.
Select attributes on the grid to do some configuration (right image). You can specify the minimum and maximum range used to scaled power percentage. This allows you to restrain DMX output to match the physical constrains of your setup. For example, you can restrain the pan and tilt attributes in order to only wash a specific part of a wall.


3.1 HSL Color Mixing
HSL stands for hue, saturation and lightness, also called HSV (V for value). HSL offers a really intuitive color mixing model and is the primary model used in the Koolfusion controller to represent colors in RGB and CMY.
When a fixture has color mixing capability, once patched you will see three attributes: hue, saturation and intensity. Lightness has been renamed to intensity to be more in line with the lighting field. Behind the scene, HSL is converted to the actual fixture color model. As you can see from the HSL image at the right, at full intensity all colors are white and at the bottom you have black. With intensity at 50% and saturation at 100%, you get pure colors.
The intensity attribute is modulated by the master intensity.


4. Masters
Here you find the master intensity and speed.
The master intensity modulates all dimmer and intensity attributes. The blackout button allows to momentarily set the master intensity to 0%.
The master speed sets the tempo for all time related functions. For example, all shapes generated using the sin, triangle and sawtooth functions are scaled down or up depending on the master speed. Grid's fade times are also modulated by the master speed. The freeze button momentarily set the master speed to 0%.

5. Status
Here you find all important status indicators. Green is good, yellow says something may be wrong and red means bad things are happening (or not happening actually). Mouse hover to see what's going on.

6. Interactive Input Selector
All sliders can be linked to an interactive input. When you select a slider, this is where you choose the input mode.
Usually, you begin by selecting an input mode like a wiimote or music and then you click on the command line icon (the cute monster) to do some customizations. See command line tips for some command line wonders.

7. Input Configuration
Depending on the interactive input selected, you configure the parameters here.

8. History
This history graph shows the last few seconds of values. It is very handy to diagnose jittering input and making some quality control.

FAQ
No DMX seems to be outputted. How do I know what's the problem?
First, make sure some fixtures have been patched (see how to patch DMX fixtures). Then you should see a "dmx out" status light. Hover with the mouse to see what's going on. You can try plugging the interface in another USB port.
Which USB to DMX interfaces does the Koolfusion controller support?
Enttec DMX USB Pro, Enttec OPEN DMX USB and the DMXKing ultraDMX.
How do I configure my USB interface?
Just plug it! Then wait a couple of seconds andthe Koolfusion controller should automatically detect it. Some fixtures need to have been patched to the USB universe otherwise the Koolfusion controller doesn't need to output anything and will not try to open the USB interface. The "dmx out" status light should turn green.
Will the Koolfusion controller automatically reconnect if my usb interface is accidentally disconnected?
Yes! The Koolfusion controller will mercilessly try to reopen the usb interface each couple of seconds.
When using my Enttec USB Pro interface, the dmx out led is yellow and saying that it's "skipping frames"?
the Koolfusion controllerouputs about 40 frames per second. Your interface is probably configured to output at a slower rate. The good news is that you can change the output rate setting by using the Enttec Pro Utlity.
Can I run the Koolfusion controller and Light Jockey on the same computer?
Yes! I've successfully tested it with a Enttec USB Pro interface.
How can I receive DMX from another lighting console not supporting ArtNET or sACN?
You can use the input feature of the DMXKing eDMX1 to take DMX in and send ArtNET to the Koolfusion controller.
How can I send MIDI from my Mac to the Koolfusion controller running under Windows?
rtpMIDI and ipMIDI are apps to send MIDI over the network from your Mac and receive it on the same or different computer running Windows.
Does the Koolfusion controller support video input via Spout?
Yes, with Spoutcam! Spoutcam is detected as a capture device. However, you need to run the 32 bits version of the Koolfusion controller since Spoutcam is in 32 bits.
What's next? Try it.